Wednesday, April 23, 2008

Level of commitment...Budget and Life.

Level of commitment.


A Number of people have commented on how fast things are going together. I think this reflects on the number of hours we are putting in on the project. I worked 8am to 2am Saturday and  10am to 10:30 pm Sunday.  Monday I did a full day of work at NetBurner Then spent the evening organizing some of the electronics planning connectors etc.. I went to bed at the early hour of 10:30pm. Today I got up at 6:30 am and went into work to spend 2 hours building our control PCB’s under the surface mount microscope. I then worked till 1pm and took 1/2 day off to spend some time with my wife. (More on why later in the post) Then I worked from 7:00 pm to 11:30 making servo mounts. I will do it all again Wednesday. I’m a bit tired, but it feels good. For all of you who read the blog and are not working on some dream or project, turn off the TV and do it. It will feel better than anything you have ever done.


Budget


Last year we had some cash  set aside for the project, we used most of what was set aside. This year we are funding the project directly out of current income. Last year cost almost never figured into the project. If we needed a part or a tool we had it next day.This year we are much more cost aware. Things like building the SMT board myself instead of sending them to our prototype house to have them build them at $500 a pop.  Ordering the raw PCB’s with 5 day lead rather than 2 day etc…. Now in my primary day job we send a lot (more than a million $) of work to the PCB assembly house and I could call them up and say its a personal project and they would probably assemble them for free, but that is not how I do business. All business needs to be mutually beneficial and nobody makes money giving freebies. We have no budget issue with building two of this vehicle. The second vehicle we will lighten to the maximum extent possible. Based on our design info that may be enough to do the 180 second flight on 90% peroxide. It may not. If it is not we may seek sponsorship for the 180 second vehicle development. If anyone would like to associate their corporate image with our project please feel free to contact me.(  Paul At Romeo Alpha Sierra, Delta Oscar Charlie dot COM  Here to decode )


Life


I would not be remotely as capable as I am if was not for my father. He taught me to build things, work on things and not to be afraid of hard work.  He was a career Coast Guard Pilot and retired to start a bush airline in Alaska when I was 12. He earned the Air Medal twice for daring rescues and in 20+ years in aviation in the harshest weather in the world never had a Fatality under his command. If you’ve seen the Discovery channel shows about crab fishing in Alaska, that is where dad flew for the Coast Guard. He did two tours of duty in Kodiak and one in Annette Island. Unlike todays Coast guard where pilots fly either Helicopter or Aircraft he flew both the large flying boats  and the helicopter. When my dad was stationed in the lower 48 he designed built and raced small outboard hydro-planes. He called his boats Flying splinters, hence the name for the vehicles in this project “Burning splinter”. In any case my dad is 78 and loosing contact with reality. He is to the point where he can not live alone and needs assistance with daily living. My step mother is going on a business trip and vacation to Paris for 14 days and we are taking care of my dad while she is gone. We have done this for shorter periods before, but two weeks is going to be a challenge. That is why I took the afternoon off to go hang out with my wife, for the next two weeks we will get very little personal space. I also expect that progress on the project will slow, but not stop. My dad likes to sit in the garage and watch us work. We are getting used to being asked what it is we are building…every 60 seconds like clock work.  

Sunday, April 20, 2008

Four Vanes done

Started at 10:00 am finished up at 10:15 pm. I made two new vane blanks on the Lathe, and played with feeds and speeds on the mill. Then I milled 4 good vanes. It takes about 1.5 hours each just for milling them down to thickness. Anything faster than that and they bend.


Millingvane


In anycase I have four good vanes and one actuator mount. Two of them were loose enough to press onto the bearings. Two required the freezer and heat gun approach.


Fourvanes


Monday night I should finish the four actuator mounts and get it all put together. (I still hate stainless).

I hate Stainless...

Some notes on how I design things. Some people make detailed 3D cad models of their complete vehicle. I do some dimensioned drawings, but I don’t make them a complete detailed cad model. The drawing below was my layout for the Jet Vanes.Vanefirst


This drawing was done in Rhino to scale. but as a flat 2d drawing. When the vane mount got welded to the exit cone if was about 0.1875 too far down. This caused me to redo my vane bearing mounts and redo the jet vanes as the bearing is now 0.2” farther from the exit cone. 


Once I have a scale drawing of the parts I make a simple dimensioned drawing I can take out to the shop or use to generate CNC code for the lathe. I don’t have a good lathe CAM program so all the Lathe CNC code is generated by hand or by writing a program to generate the CAM file. The CAM generation on the mill is automated from the drawing.


VaneDraw1


This is the drawing for my new corrected vane. I got up this morning and went to two places, IMS to get more 316 stainless shaft to make vanes out of, and to Marshals Industrial hardware to get some more carbide end mills to cut the stainless. So after working from 8 am to 1:30 am I have the following:


StainlessCarnage


The three parts on th left are not yet destroyed. All the parts on the right are toast in various ways. The four that look relatively complete are done to the original drawing and are now the wrong dimension. Some of the bad ones have the wrong bearing dimension (They are loose on the bearing), I had a problem in my hand crafted lathe code where I made 4 exact errors…. The other two are the result of milling problems, the new carbide bits I got today just aren’t lasting. MY last set that I ordered from MSC would do two vanes before they were dull, the ones I picked up today last for 1/2 of a vane.  So since I went through all my carbide tooling I though I’d try a big 3/4 TAIN coated HSS end mill, real slow…. The one in the middle left with the notch is the result of that experiment. The bit cut just fine … for awhile then it suddenly welded it self to the work piece and when I based the mill to recover it bent the vane. The three parts on the left are done with the lathe work (sort of) and now need milled. The one on the bottom left that looks like it was gnawed by a rabid squirrel is the result of trying to part off the  vane and having the parting tool die. I really should not be parting solid stainless on my Lathe its just not rigid enough, but I don’t have the shop space for the proper tool, a metal cutting horizontal band saw. I even tried the Armstrong method, I bought the highest quality hacksaw blades I could find at home depot and after two strokes the stainless removes all the teeth. 


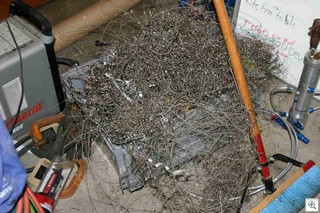
Lastly the lathe makes miles of razor sharp stainless turnings, They get tangled with everything and cut you if you just look at them crooked.Stainlessknives


 As a general rule I don’t wear gloves near machine tools, its a good way to loose your hand. So in the last 24 hours I’ve bled from 5 of my 10 fingers.


Cutfinger


The vanes are bieng used in a hot oxygen stream so I need the maximum oxidation resistance, otherwise I’d use 303 stainless a lot easier to machine. Did I say I hate Stainless?  Hopefully today will go better…


Friday, April 18, 2008

Plumbing complete

The vehicle plumbing is complete. I should have the Jet vanes finished Saturday. That leaves wiring. We weighed the vehicle as is and its  96 lbs . We have less than 5 more pounds to add (not including payload) and we should be a full 25% under our target weight. We can meet our 90 second hover with an average achieved ISP of 79 seconds.


Without payload running 90% peroxide we should be able to hover for 160 seconds.

Monday, April 14, 2008

Best of Days Passed Hydro

PassHydro


Minimum Structural Hydro 1.2  1.2x 300 = 360 PSI, we went past 360. Design burst is more than 600 design SF 2.0 we can now start some actual testing, the vehicle will never be presurized with humans in the safety hazard zone. We will build a second vehicle with better weld prep and hydro that to a higher pressure.  for now we can do a lot of testing with tank pressure < 240 PSI.

Sunday, April 13, 2008

Update...

Congratulations to Cal State Long beach/Garvey Space, (The team members overlap a lot so I’m not sure which group was the lead, the rocket I saw pictures of had decal for both) I heard  they successfully flew a Lox Methane rocket this weekend.   (I think this is the first ever) This adds to that groups firsts:


  • First Flown composite Lox Tank.

  • First flown aerospike

  • First flown Lox Methane.


For Unreasonable Rocket we think we were able to repair the tank. We will do a new Hydro test on Monday night or Tuesday. We re-welded the entire seam with a lot more heat. In any case I’ve been investigating new tank concepts and I’ve found a tank concept that will be stunningly light for peroxide. We may work on this for the 180 second vehicle. 


I finished machining my first Jet vane and shaft out of billet stainless (I hate machining stainless) I’m going to try to finish a couple more tonight. The Lathe work is done on all four ,the mill work still needs done on three of them.


OneJvane


I hunted down the cause of my helicopter crash and resolved that. I had a gain constant off by a factor of 2 when switching from position hold mode to position  and altitude hold mode. I flew it again and it flies nicely, but the tail rotor started acting really flaky. It would drift all over the place and not hold heading. Something is wrong, but all my field diagnostics gave me no info. I’m a bit stumped. I’m tempted to give the computer direct tail rotor control and remove the tail rotor gyro using only the IMU for tail rotor control. Just Like Jack did a while ago…

Tuesday, April 08, 2008

Best of Times woorst of times..


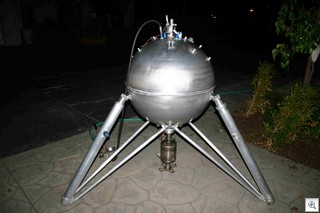
Tonight we went from vehicle ready to wire…


SphereVehicleActual


To almost passing hydro test… For our operating pressure of 300 PSI the FAA minimum is 360 PSI, the sphere has a design burst of > 600 PSI, we got to some where between 350 and 370  we wanted 375 to 400. (We will never presurize in the presence of humans.)


TankFail


Its clear we did not get enough penitration, the weld only went ~half way through the base metal. Very discouraging.

Sunday, April 06, 2008

Quick Update...

The Landing Gear main legs are done after the first attempt did not work, the orings leaked and the retaining ring was not strong enough. We will get the gear brace mounts welded up on Tuesday, it shoul dbe sitting on it’s gear by mid week. We had hoped for a full vehicle static fire on Saturday, its looking unlikely.


Crashed the helicopter again, only very minor copter damage, but destroyed on of the expensifve LiPo battries. Went into a weird pitch and roll osscilation.  Probably need to do some gain tuning. broke one blade and destronyed the battery, otherwise undamaged.